 INGInious
This lab will allow you to:
- Diagnose: use vtysh to inspect peering relationship between AS.
- Fix: identify and resolve configuration errors
In this lab, you will need to verify and enforce the following classical interdomain routing policies:
- Routes learned from a customer must be exported to all neighbors (customers, peers, and providers).
- Routes learned from a peer or a provider must be exported only to customers.
In addition, you must correctly configure local preference to ensure proper path selection:
- Routes learned from a customer are preferred over all others.
- Routes learned from a peer are preferred over routes learned from a provider.
Lab Presentation
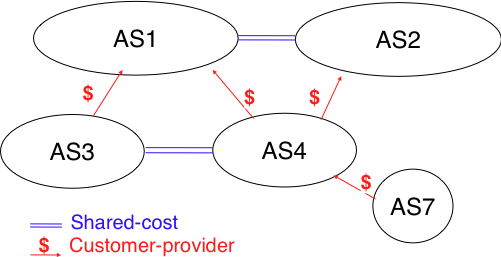
This image represents the correct topology (without errors) that you should obtain after debugging [1].
Each router should advertises its loopback address as a BGP prefix.
This lab contains a preconfigured network infrastructure, but several intentional errors have been introduced. It's up to you to identify and fix them!
📥 Download the Base Lab
To begin the exercise, you need to download the archive [2]. It contains the base configuration with errors to fix.
Diagnostic Tools
vtysh is the unified command-line interface of FRRouting (the routing software used in the containers).
It allows you to configure and inspect all routing protocols (BGP, OSPF, RIP, etc.) from a single interface.
Useful commands for diagnosing BGP:
# Access vtysh on r5
root@r5:/# vtysh
r5#

# All following commands are run inside vtysh

# Displays the active BGP configuration
show running-config

# Display BGP neighbor summary (session status, local pref values...)
show bgp ipv6 summary

# Display the complete BGP routing table (learned routes)
show bgp ipv6 unicast

# Display routes advertised to the neighbors
show bgp neighbors <IP> advertised-routes

# Display BGP communities
show bgp ipv6 detail
show bgp neighbors ... command lets you view useful information. Try experimenting with its various options. It's a great way to check which routes are coming in and going out.Recommended Approach
Explore the topology
Examine the
lab.conffile to understand which containers are defined and how they are connected. Use the image above to visualize the connections.Connect to containers
Use Kathara to start the lab and connect to each router/container:
cd ./variant_X

# Start the lab, automatically opens terminals
kathara lstart

# Open a terminal
kathara connect [node_name]

# Remove containers
kathara wipe
Inspect the configuration
Fix the errors
📌 Important Rules:
- ❌ Do not modify the
lab.conffile (it is correct and contains no errors) - ❌ Do not create new files (all corrections are made in existing files)
- ✅ Respect the exact folder structure of the provided archive (relative paths are important)
Modify the files and report these changes to the corresponding files on your host machine (those that will be re-archived).
- ❌ Do not modify the
Validate your fixes locally
cd ./variant
python3 -m kathara_lab_checker --config correction_student.yaml --no-cache --lab .
# or
kathara_lab_checker --config correction_student.yaml --no-cache --lab .
Submit your solution
Once all tests pass locally (remember to add more), compress the entire
variant_Xfolder into a .zip file and upload it below.
- Kathara: Documentation | Installation | Commands
- FRRouting Documentation: BGP Commands
- Computer Network online syllabus: BGP example
| [1] | This topology is taken from the Computer Networks online syllabus |
| [2] | This file gives an high score, the goal is to reach 100%. |